Scale Your Customer Support: Introducing WhatsApp Integration for AI WooChat Pro Flow Builder
In today’s fast-paced digital world, customers expect to connect with businesses on the platforms they use most. That’s why we are thrilled to announce our latest update: The WhatsApp Flow Builder Node.
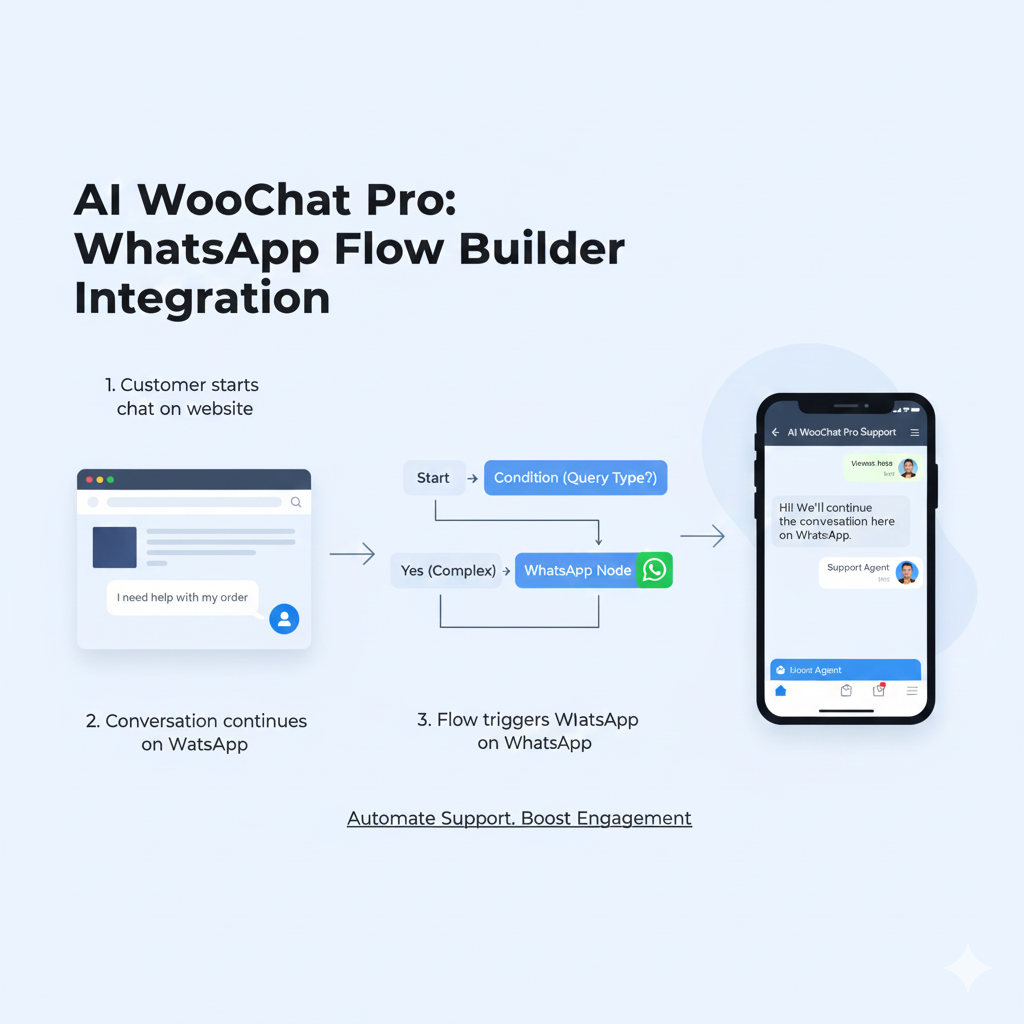
Now, you can seamlessly bridge the gap between your website’s chat widget and the world’s most popular messaging app. This feature allows you to automate conversations and hand off website visitors directly to your WhatsApp Business account with zero friction.
What is the WhatsApp Flow Builder Node?
The WhatsApp node is a powerful new block in the AI WooChat Pro Flow Builder. It allows you to create a logic path where, based on user interaction, the system automatically initiates a conversation on WhatsApp.
How it Works:
- Automation: You add the "WhatsApp" node into your custom flow.
- Instant Connection: When a visitor triggers that node in your website chat widget, the system uses your configured API to send a message.
- Two-Way Sync: If a visitor sends a message through the widget via this node, it arrives in your WhatsApp Business account. When you reply from WhatsApp, the message is sent back to the visitor in the chat widget!
Why Use WhatsApp Integration?
- Higher Engagement: WhatsApp has significantly higher open rates than email or SMS.
- Convenience for Customers: Users can start a chat on their desktop and continue it on their mobile device via WhatsApp.
- Centralized Communication: Manage your website leads directly from your official WhatsApp Business API account.
- Improved Trust: Official WhatsApp Business profiles add a layer of credibility to your brand.
Step-by-Step Guide: How to Configure WhatsApp for Your Store
Setting this up is easy. Follow these steps to get started:
Step 1: Configure Your WhatsApp Business API
Before adding the node to your flow, you must connect your provider.
- Navigate to Settings > WhatsApp Business API Settings in your dashboard.
- Select Your Provider: Choose between Meta Cloud API, Twilio, or 360dialog.
- Enter Credentials: Fill in your WhatsApp Business Account ID, Phone Number ID, and Access Token (from Meta for Developers).
- Set a Default Number: Enter the phone number where you want to receive messages in E.164 format (e.g., +15551234567).
- Click Verify Connection: Ensure your API is communicating correctly.
Step 2: Add the WhatsApp Node in Flow Builder
- Go to the Flow Builder section.
- Drag and drop the WhatsApp block from the sidebar into your canvas.
- Configure the Node:
- Message: Type the initial message you want the system to send (e.g., "How may I help you?").
- Variable Name: Use the auto-generated variable to track this interaction in your templates.
- Connect the node to your existing logic (for example, after a user clicks "Talk to an Expert").
- Click Save Flow.
Step 3: Test the Experience
Open your website's chat widget. Navigate through the flow until you reach the WhatsApp step. You should see the message appear in your WhatsApp Business account, and you can now reply directly to your visitor!
Best Practices for Your WhatsApp Flow
- Use Conditional Logic: Only trigger the WhatsApp node for high-intent queries (like pricing or technical support) to keep your agents focused.
- Set Clear Expectations: In the "Message" field of the node, let users know an agent will be with them shortly on WhatsApp.
- Monitor Performance: Check your "Chats" dashboard to see how many visitors are successfully moving from the widget to WhatsApp.
Ready to transform your customer journey?
Log in to your AI WooChat Pro dashboard today and start building smarter, more connected customer experiences with our new WhatsApp integration.